Luna Hexagon
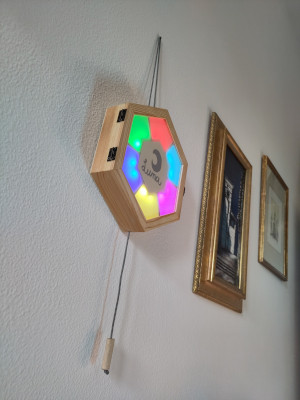
Luna hexagon is an electronic game I built for my daughter. It is based on ESPHome.
How it works (user's perspective)
Baby interaction
She's 8 months old, so the interaction should be very simple. She mostly grabs and pulls objects, so there's a cord knotted to a limit switch's lever. When she pulls the cord, one of the sectons in the hexagon lights up and the corresponding tune is played.
Parents interaction
It doubles as a night light: in this case the hexagon sections are not individually controllable, they all light up the same, but it's still RGB and dimmable. It can be controlled via Home Assistant (it appears as a standard dimmable RGB light) or via a web browser (it exposes a simple webpage with the light controls).
It works on batteries, they last from 4 to 8 hours, depending on the usage.
Worklog
See the complete worklog here: (TODO: Link to the Fediverse)
How to build one
BOM
- ESP8266
- An 8 Ohm speaker
- Neopixel compatible 5v led strip
- Limit switch
- Battery holder
- Power switch
- A nice case (mine was sold as a tea box)
Flash the firmware
The file containing the firmware definition is hexagon.yaml. That's the file you'll flash to the ESP8266.
First of all, you need to adapt the configuration for your wifi connection. I've placed a couple of example in the yaml file, one with DHCP (for use with Home Assistant) and one with static IP (for standalone use, needed to access the web interface in case you don't own an home assistant instance). Change them to match your configuration. The Wifi SSID and password are stored in a separate file called secrets.yaml. I provided an example file, secrets.yaml.example, just rename it and replace the SSID and password.
To flash the firmware you have 3 options. From simplest to hardest:
- If you can use Chrome/Chromium web browser, you can use ESPHome Web flasher
- If you have Home Assistant, you can use the ESPHome Device Builder
- You can also use the ESPHome CLI
In any case, the file you have to use is
hexagon.yaml.
Build the game
Find a suitable enclosure, install the switches, speaker, battery holder and ESP8266. Cut the neopixel-compatible led strip in six chunks of two leds, stick it to the 6 sections of the box and solder it according to the electric scheme. Test it all and decorate as you prefer.
You will find useful:
- the Electric scheme (image, or if you prefer you can open the KiCad project)
- the worklog (TODO: Link to the Fediverse) to see how I built mine
Contributing
Want to contribute? Ask me an account writing an email to daniele.verducci@ichibi.eu
